Just a small tutorial on how to do digital art in photoshop...
but WITHOUT your tablet or your mouse!!!!


1. Plan out your drawing... TRADITIONALLY. Normally I would roughly draw it out with colour pencils; RED is the rough one and BLUE is the final one. Then I would outline it with my pen/marker, but you could skip this part, since you're going to do the outline in Photoshop anyway. If you like, you could plan your shading ahead too. That way you could check if the shadow looks awkward to you. (Planning ahead saves lot of time...)
 2. Outlining... also the LONGEST part of your work. (Normally, you can scan your drawing, but I'm too lazy for that. So I just took a photo with my cell and upload it in my PS.) Start a new layer on top of your original drawing, then the secret of how I did the whole drawing without my tablet or mouse. Is that I used PEN TOOL in Photoshop. To be honest, it's not going to be easy for this part. You really have to fully understand how to use pen tool, and to be clear on what kind of line work you like to produce.
Pen Tool Tutorial: http://www.youtube.com/watch?v=_bJSWni7Huw
 3. Colouring... Start a new layer and move it under your line work layer. Then just fill in all the base colour that you desired.
 4. Depth... I'm sure your character is not all FLAT like a piece of paper. So what you want to do is; make a new layer and move it on top of your base colour layer (right-click and choose Create Clipping Mask), change the Paint Bucket Tool to Gradient Tool, then select out the area to put shade in. (Recommended shading colour: Dark Brown, Indigo, Blue)
 5. Make it interesting!!... Put in depth is not enough, start a new layer on top of the shading layer. Use the Gradient Tool again, use any colour you want, then turn down the Opacity in the Layers column. JUST MAKE IT LOOKS INTERESTING!!!! P.S. At this point, you should put all your layers in a Group/ Folder. Except your line work layer.


 6. Highlight... Start a new layer, right-click it to Create Clipping Mask. Use Pen Tool and white colour for your high light. Then you can turn down the Opacity to adjust your hight light.
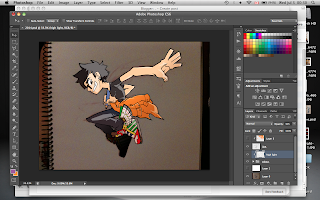
 7. Colouring your outline (Optional)... See my character's fingers are brown, right? Just use another Clipping Mask, then you are good to go.

 8. Background... Do whatever you want? But if you want to know how I make those brush strokes background, I just download it from the website.
Photoshop Brushes: http://www.brushesdownload.com/brushes.asp
8. Background... Do whatever you want? But if you want to know how I make those brush strokes background, I just download it from the website.
Photoshop Brushes: http://www.brushesdownload.com/brushes.asp

I hope you had fun doing it!!!!! ;)
If you have more questions, feel free to leave a comment.


No comments:
Post a Comment